October 28, 2015
Series: Brilliant Activities for Birth Educators: Trick or Treat - Halloween Spoils Make Great Teaching Aids
By: Sharon Muza, BS, LCCE, FACCE, CD/BDT(DONA), CLE | 0 Comments
By Stacie Bingham, LCCE, CD(DONA)
 October's Brilliant Activities forBirth Educators honors the Halloween holiday as educator Stacie Bingham takes us down the Halloween aisle for items you can use to make props for teaching families about baby's movement through the pelvis. Stacie is a creative educator who is always coming up with new ways to introduce families to concepts that help them to have safe and healthy births. I would also like to take a moment to congratulate Stacie on passing the recent Lamaze exam and earning the credentials Lamaze Certified Childbirth Educator. Way to go Stacie! Enjoy this month's Brilliant Activities forBirth Educators post and consider checking out past posts as well for other great ideas. Happy Halloween! - Sharon Muza, Community Manager, Science & Sensibility
I am crafty and cheap frugal; finding alternatives to traditional (costly!) childbirth education supplies is one of my favorite pastimes. I wander thrift stores, clearance aisles, even the market where I buy groceries, always thinking: what could I do with this? It has enabled me to build up a collection of props to support my classes at very little cost, while also giving me more wiggle room in my budget for items that must be purchased, such as media and print resources.
 Make your own mini pelvis, placenta, umbilical cord and amniotic sac
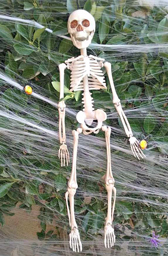
Last October, I had the idea of creating a miniature baby/pelvis model from a Halloween skeleton. I made a trip to my local superstore and purchased a skeleton, and then my labor began. I had a tiny baby doll, I believe it is a Barbie baby from sometime in the past 20 years (it was my little sister's, swiped acquired by me on a visit to my mom's house). I started digging around my house to see what else would work. My supply list ended up as follows:
- Skeleton (I used a 10 inch one in this example)
- Doll that fits through skeleton's pelvis
- Embroidery floss, blue and red
- 1 Orthodontic rubber band
- Needle and thread
- Reddish fabric for placenta
- Plastic baggy (amniotic sac)
- Washi tape
- Tiny baby sock (uterus)
How to assemble the pelvis
I started by separating the pelvis from the torso with scissors. I boiled some water on the stove and submerged the pelvis in while holding on to the legs. Every so often I would pull it out and work to widen the pelvis. I used scissors, although other tools would work as well. After repeating this a few times, re-submerging and working again, the pelvis shape was to my liking. Then I used a utility knife to further excise the remaining segments of the spine.
 How to assemble the umbilical cord and placenta
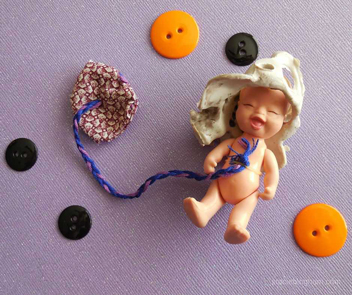
For the umbilical cord, I used three strands of embroidery floss, which I braided together. To make the placenta, I took two small squares of fabric (leftover from a quilting project), and cut a circle shape. I turned the fabric prints to face each other, and then I began to sew. I left a small opening so I could turn the fabric right-side out (I found a straw handy to help poke out all the places I couldn't reach with my fingers), and then I closed the hole with a couple of small stitches. At this point, I took the 'cord' and threaded it through the needle (did I mention I used a very large needle?). Carefully inserting the needle through the side of the placenta between stitches, so it would disappear into the placenta, I poked the needle out through the middle of one layer of the placenta, anchoring it into place and allowing the cord to attach from that spot. I wasn't sure how I would link the baby to the cord, which is where the orthodontic band came into place. It is clear and fit snugly around the baby's belly. Since there was a tiny knot in the end of the cord, I simply tucked it under the band.
 How to assemble the amniotic sac
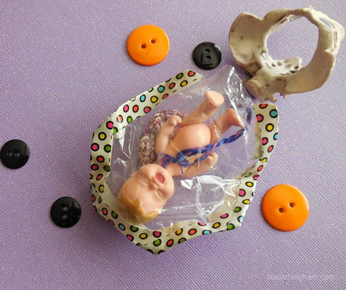
For the amniotic sac, I turned to a clear plastic baggy. I cut it into a u-shape and used Washi tape to seal the edges. It is a bit disconcerting to see a baby in a plastic bag, and there are so many other things you could use - one item that comes to mind is an organza bag you might get candies or favors in at a wedding or shower. The final touch was, using one of my baby's socks for the uterus, and, voila!
How I use it
I love the idea of table-top props, those designed to be used as you sit across the kitchen table from a couple during a private class. The tiny pelvis and baby fits easily into my bag with the curriculum, handouts, and other supplies I may need, saving me from dragging my big set along. If you are talented enough, consider making many sets of them, and providing each family a set to use in your group classes.
What the families say
Families enjoy getting to manipulate the baby through the pelvis as you take them through the class content. Often parents are delighted to see such a small little baby and pelvis, and they want to touch and try, passing the baby through the bones. The benefit of seeing and navigating the baby through the pelvis with these teaching aides supports two of the Lamaze International Healthy Birth Practices, #2: 'Walk, move around and change positions throughout labor' and #5 'Avoid giving birth on your back and follow your body's urges to push.' For some parents, this is the first time this idea has been not only explained, but more importantly, demonstrated. The little kit is always well received.
Conclusion
I am sure this design could be improved upon, and I would love to hear your ideas! It took me less than an hour and about $5 to complete this project - I was only limited by my imagination and what was lying around my house (as a personal challenge). This Halloween season, I also purchased three boxes in the shape of (haunted) houses that nest inside each other, and a candy mold of tiny brains. I recovered the houses with scrapbook paper and am creating an activity about making hospital birth more like home, and the candy molds will be tiny soap-reminders for families to use their 'BRAIN's when making birth choices. (Benefits, Risks, Alternatives, Intuition and Not Now.) With Halloween fast approaching, get out there and see what you can find in the seasonal sale bins to make your classes interesting and exciting, and keep your supply budget down. Remember, making your own supplies doesn't have to be scary! It can be economical and a lot of fun.
For complete instructions with pictures, and more DIYs for CBEs, visit me at www.staciebingham.com.
About Stacie Bingham
Stacie Bingham, LCCE, CD(DONA), embraces the lighter side of the often weighty subject of birth. Her style feels more like a comedy-show experience than a traditional class. She has been a La Leche League Leader for 13 year, attended 150 births as a doula, and logged 1000 hours as a childbirth educator. An experienced writer and editor, she was a columnist for the Journal of Perinatal Education's media reviews, has been published in LLLI's New Beginnings and DONA International's International Doula, and keeps up with her blog (where she frequently shares her teaching ideas).
She is the current Chair for Visalia Birth Network, and a founding member of Chico Doula Circle, and Advocates for Tongue Tie Education. Stacie has presented at conferences on the topic of tongue tie, as her 4th baby came with strings attached. Stacie and her four sons, husband, and two dogs reside in California's Central Valley. For more information or teaching tips, visit her at staciebingham.com.
Tags
Childbirth education Pelvis Professional Resources ChildBirth Classes Practical skills ChildBirth Education Aids Brilliant Activities For Birth Educators Stacie Bingham Series: Brilliant Activities For Birth Educators Fetus